Lifecycle API란 무엇인가?
Lifecycle API란, 컴포넌트가 브라우저에서 생성될 때/업데이트 될 때/제거될 때, 호출되는 API이다.
React 컴포넌트의 lifecycle은 다음과 같다.

React lifecycle API 3단계
Mounting: React 컴포넌트의 인스턴스가 생성되고, DOM에 삽입되는 과정의 lifecycle
(Mount: 컴포넌트가 DOM에 삽입되는 것)
- constructor
- componentWillMount
- render
- componentDidMount
Updating: prop 또는 state의 변경으로 해당 컴포넌트가 re-rendering 되는 경우의 lifecycle
- componentWillReceiveProps(props가 변경될 때만)
- shouldComponentUpdate
- componentWillUpdate
- render
- componentDidUpdate
Unmounting: 컴포넌트가 제거되는 과정의 lifecycle
(Unmount: 페이지 이동으로 인한 그 전 페이지에서의 컴포넌트는 DOM에서 분리되는 것)
- componentWillUnmount
React v16.3 이전의 Lifecycle API
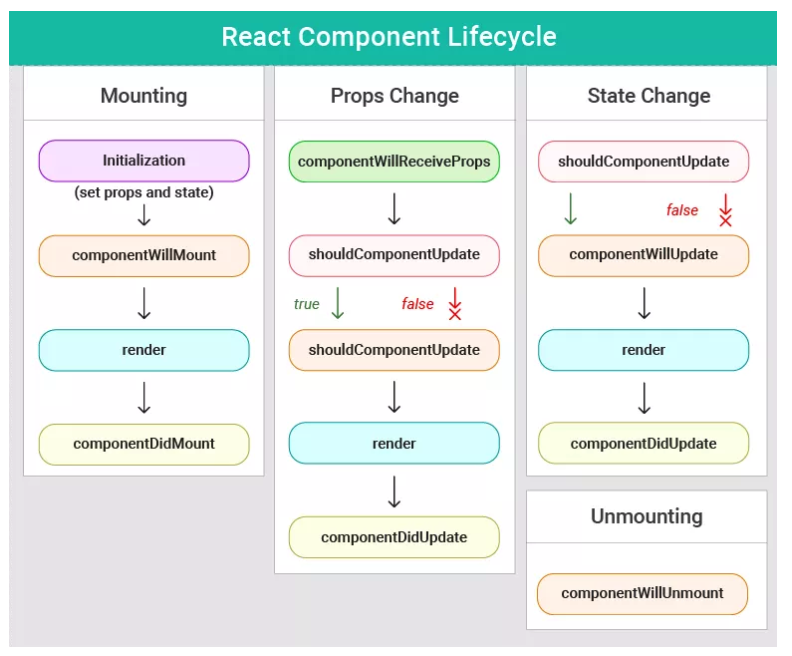
출처: React v16.3 이전의 Lifecycle API
Mounting
React 컴포넌트의 인스턴스가 생성되고, DOM에 삽입되는 과정의 lifecycle
constructor
우선, lifecycle API 전에 컴포넌트가 새로 만들어질 때마다 제일 먼저 호출되는 것이 바로, constructor(컴포넌트 생성자 함수)이다.
참고로, 컴포넌트에서 state를 정의할 때는 2가지 방법 중 하나를 사용하면 된다.
- Class fields 문법
- Constructor 사용
Class fields 문법
1 | class InvestContainer extends Component { |
Constructor 사용
1 | class InvestContainer extends Component { |
super(props)를 호출한 이유:
ES6 class의 constructor에서 super 메소드를 사용하는 이유는, 자식 클래스에서 super 메소드를 사용함으로써 자식 class의 constructor 내부에서 부모 클래스의 constructor를 호출한다. 즉, 부모 클래스의 인스턴스를 생성해서, this를 사용할 수 있게 된다. 만약 super 키워드를 사용하지 않으면, this에 대한 참조 에러가 발생한다. 다시 말하면, super 메소드를 호출하기 이전에는 this를 참조할 수 없다는 것을 의미한다.
리액트에서 컴포넌트를 class형으로 만들때는, 모두 기본적으로 리액트에 있는 ‘Component’라는 부모 클래스로부터 상속받아 자식 클래스로 시작하게 된다. 그래서 자식 클래스에서는 super 메소드를 사용해서 , 부모 클래스(Component)의 constructor를 호출, 즉 Component 클래스의 인스턴스를 생성해서 this를 사용할 수 있게 되는 것이다. 그 다음에, this를 이용해 프로퍼티를 초기화할 수 있다.
정리하면, constructor를 사용한다면, 반드시 super()를 불러와야 한다. super()를 사용하지 않으면, this가 초기화되지 않는다.
그러면, super()에 props를 사용해야 하는가?
constructor 안에서 this.props에 접근하고 싶다면, super(props)를 사용한다.
만약, super() 이렇게만 사용하면 다음과 같이 나온다.1
2
3
4
5
6class MyApp extends React.Component{
constructor(props){
super();
console.log(this.props); // this.props is undefined
}
}
위 코드에서 super(props)라고 사용해야 this.props에 접근할 수 있다.
그러나, constructor가 아닌 다른 곳에서 this.props를 사용하고 싶으면, constructor 안에 props를 넘겨줄 필요가 없다. 왜냐하면, React에서 자동으로 세팅해주기 때문이다.
이 방법이 더 복잡하므로, class fields 문법으로 주로 사용하는 것이 더 편리!
componentWillMount
컴포넌트가 DOM에 삽입되기 전(Mount 되기 전)에 호출되는 API이다. 즉, render가 되기 전이기 때문에, 컴포넌트가 브라우저에 나타나기 전(화면에 나가기 전)에 호출되는 API이다.
사용 이유
- mount 직전에 하고 싶은 것들(i.e. 방문자가 어떤 페이지를 방문했는지 Google Anlaytics에 신호할 때)이 있을 경우 사용
- 루트 컴포넌트에서 APP과 관련된 외부 API를 설정할 때 사용
React v16.3 이후부터는 해당 API가 deprecated 되어서, 사용하면 안된다.
기존에 이 API에서 하던 것들을 constructor와 componentDidMount에서 처리 가능하다.
componentDidMount
컴포넌트가 DOM과 삽입(Mount)되고, render가 된 이후에 호출되는 API이다.
이 API는 페이지가 첫 렌더링 될 때, 호출되는 API이다. 즉, 이 컴포넌트가 사용된 페이지가 처음 로드 될때, 또는 refresh로 다시 이 페이지가 불러올 때 등으로 인해 처음으로 렌더링 될 때, 호출되는 API이다.
사용 이유
- DOM에 대한 접근이 필요한 모든 설정을 수행할 때 사용(DOM의 속성을 읽거나 직접 변경하는 작업 등)
- 해당 컴포넌트에서 필요로하는 데이터를 요청하기 위해 사용(axios, fetch 등을 통한 ajax 요청)
- 외부 라이브러리 연동
- addEventListener 적용
예를 들면, 액션을 발생시켜 서버로부터 데이터를 받아올 수 있다.1
2
3
4componentDidMount() {
this.props.getEachProject(this.props.projectId);
this.props.getContractList({ projectId: this.props.projectId });
}
또는, addEventListener를 적용할 수 있다.
1 | componentDidMount() { |
Updating
컴포넌트의 업데이트는 props 또는 state의 변화에 따라 결정된다.
componentWillReceiveProps
컴포넌트가 새로운 props를 받게됐을 때 호출되는 API이다. 즉, 새로운 props로 어떠한 작업을 수행하기 전에, 이 새로운 props를 인자로하여 이 API가 호출된다. 새로 받게될 props는 nextProps로 조회 가능하고, this.props는 현재의 props를 말한다.
사용 이유
- props를 받아서 state를 변경해야 하는 경우 유용하다.
다음과 같이 작성할 수 있다.1
2
3
4
5componentWillReceiveProps(nextProps) {
if (this.props.percent !== nextProps.percent) {
this.setUpPercent(nextProps.percent);
}
}
또는,
1 | componentWillReceiveProps(nextProps) { |
이 API는 초기 렌더링시에는 호출되지 않는다.
shouldComponentUpdate
컴포넌트 업데이트 직전에 호출되는 API이다.
사용 이유
- 컴포넌트를 최적화하는 작업에 사용
- 즉, 해당 컴포넌트의 re-rendering를 제어할 때 사용
이 API는 항상 boolean(true 또는 false)을 반환한다. 즉, 해당 컴포넌트를 re-rending할지 말지를 결정하는 API이다.
컴포넌트를 최적화하기 위해서는, 필요없는 re-rending을 막아야 하고, 그러기 위해서는 props 또는 state가 변경되었을 때만, re-rendering 하게끔 이 API안에서 코드를 작성하면 된다.
예를 들어, 다음과 같이 작성하면 된다.1
2
3
4shouldComponentUpdate(nextProps, nextState) {
return this.props.engagement !== nextProps.engagement
|| nextState.input !== this.state.input;
}
componentWillUpdate
이 API는 update가 발생하기 전 어떤 작업이 필요한 경우 사용하는 API로써, shouldComponentUpdate에서 true를 반환했을 때만, 호출되는 API이다. shouldComponentUpdate가 이미 사용되고 있는 컴포넌트에서 componentWillReceiveProps를 대신 사용한다. 이 API가 호출되고 난 다음에는 render() 함수가 호출된다.
사용 이유
- 애니메이션 효과를 초기화할 때 사용
- 이벤트 리스너를 없앨 때 사용
이 API에서는 this.setState()를 사용하면 무한 루프가 일어나게 되므로 사용하면 안된다.
예를 들어, props가 업데이트 되기 전에 어떤 element를 fade out 애니메이션 효과를 주고 싶은 경우에는 다음과 같이 사용한다.1
2
3
4
5
6
7
8componentWillUpdate (nextProps, nextState){
if(!nextState.show){
$(ReactDOM.findDOMNode(this.refs.elem)).css({'opacity':'1'});
}
else{
$(ReactDOM.findDOMNode(this.refs.elem)).css({'opacity':'0'});;
}
}
componentDidUpdate
componentWillUpdate 이후, render() 함수가 호출된 뒤에 호출되는 API이다.
이 시점에서는 this.props와 this.state가 새로 변경되었고, 대신에 이전 값들인 prevProps와 prevState를 조회할 수 있다.
사용 이유
- props 또는 state에 따라서 DOM을 업데이트 할 때 사용
1 | componentDidUpdate(prevProps, prevState) { |
Unmounting
componentWillUnmount
컴포넌트가 DOM에서 삭제된(분리된)(=== unmount) 후 호출되는 API이다.
A 페이지에서 로그인 컴포넌트를 사용하고, B 페이지에서는 장바구니 컴포넌트를 사용한다고 하자. 그러면, A 페이지가 로드가 되면, 로그인 컴포넌트가 마운트가 된다. 그러다가, B 페이지로 이동하게 되면, 로그인 컴포넌트는 언마운트 되고, 장바구니 컴포넌트가 마운트가 된다. 즉, 페이지 이동으로 인한 기존 페이지에서의 컴포넌트가 그 페이지의 DOM에서 분리되는 것을 Unmount 라고 한다.
만약 componentDidMount에서 addEventListner를 사용했는데, 다른 페이지에서는 이 addEventListner를 사용하고 싶지 않다면, componentWillUnmount에서 이 컴포넌트가 Unmount 되기 전에, 이 addEventListner를 제거해야 한다.(removeEventListener)
왜냐하면, addEventListner는 window.addEventListner 이렇게 사용하기 때문에(window 객체의 메소드), 전역으로 다른 페이지에도 영향이 간다. 그래서, 이 페이지에만 사용할 것이라면, 이 페이지의 컴포넌트가 Unmount 될 때, addEventListner를 제거해야 한다.
사용 이유
- removeEventListener로 이벤트 제거
- 등록했었던 이벤트 제거
- 컴포넌트 내부에서 타이머나 비동기 API를 사용하고 있을 때, 이를 제거하기에 유용하다.
- setTimeout 함수를 사용했다면, clearTimeout을 통하여 제거
예를 들어, removeEventListener로 이벤트 제거 할 수 있다.
1 | componentWillUnmount() { |
React v16.3 이후의 Lifecycle API
React v17 부터 depreciated 될 API
- componentWillMount
- componentWillReceiveProps(v17: getDerivedStateFromProps)
- componentWillUpdate(v17: getSnapshotBeforeUpdate)
React v17 부터 추가될 API
- componentDIdCatch: 컴포넌트 에러 핸들링 API
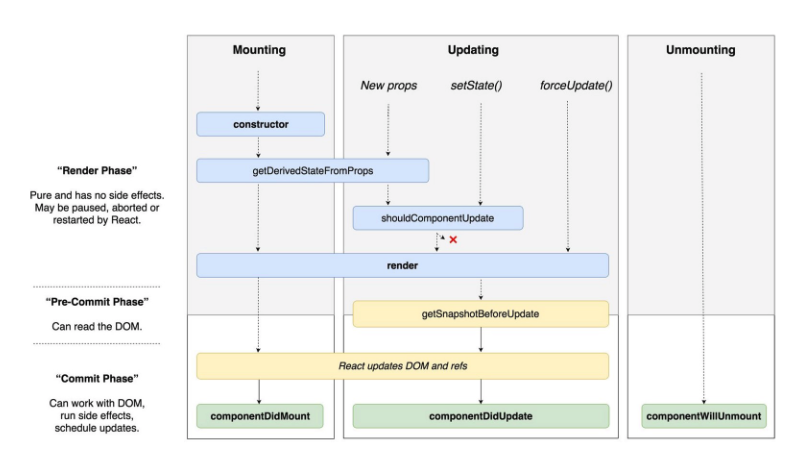
출처: React v16.3 이후의 Lifecycle API
React v16.3 이후에 변경된 부분
몇개 lifecycle API가 변경된 부분이 있다. 아래의 링크에서 확인해보자.