안녕하세요, 영향력있는 개발자 노천명입니다.
Email: cheonmro@gmail.com
브라우저에서 Alt + F 누르고 검색
- 회사내 프로젝트:
ICONLOOP - 개인 프로젝트:
Projects - 백엔드 프로젝트:
Back-End
About Back-End
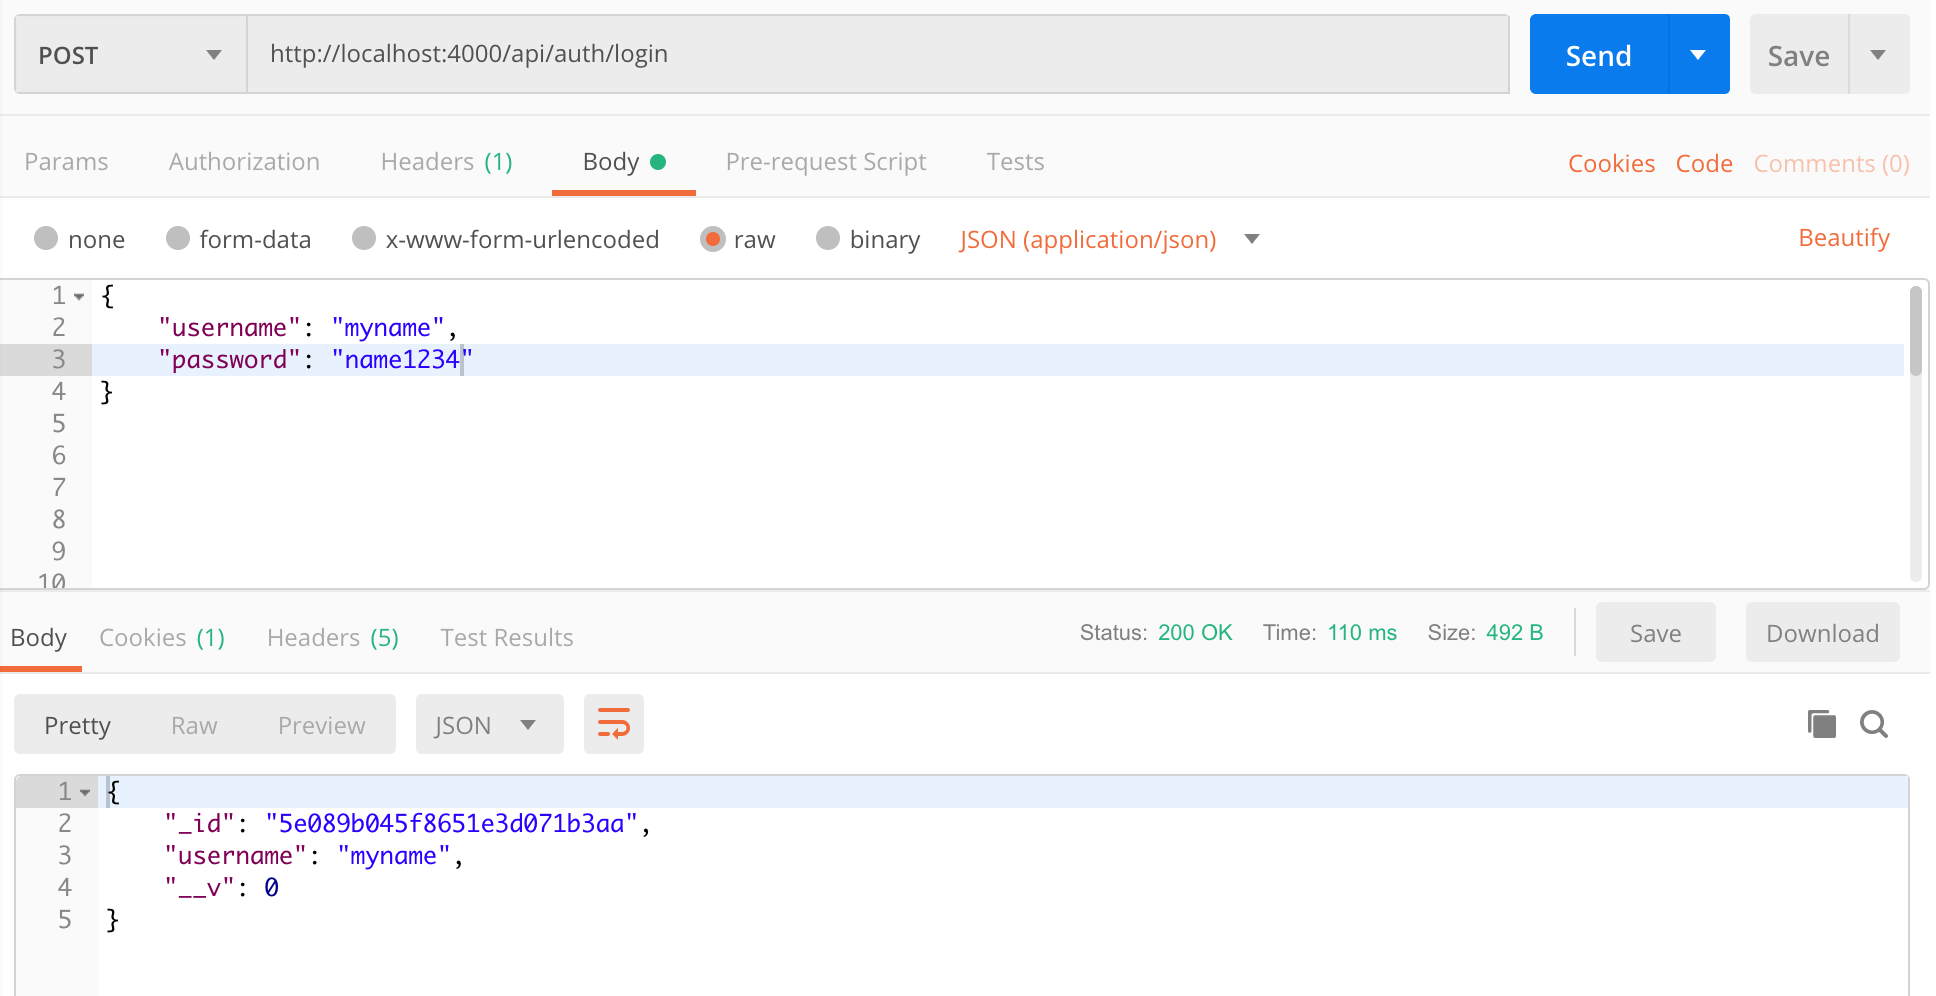
#2. JWT Authentication REST API
- 목표: JWT를 활용한 회원가입 및 로그인 REST API 개발
- 기술 스택: Node.js, MongoDB, Mongoose
- 핵심 내용:
- 회원가입, 로그인 및 로그아웃을 할 수 있는 REST API
- 회원가입, 로그인, 그리고 토큰과 관련된 DB 스키마 및 모델링
기능구현
1. REST API
1 | // auth.ctrl.js |
2. SCHEMA & Modeling
1 | // models/user.js |
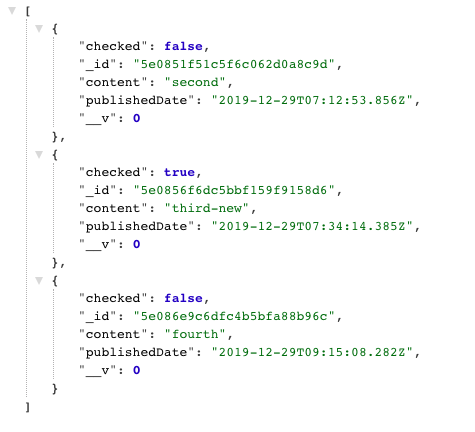
#1. Todo List REST API
- 목표: todo list 앱에 필요한 REST API 개발
- 기술 스택: Node.js, MongoDB, Mongoose
- 핵심 내용:
- todo를 추가/확인/수정/제거 할 수 있는 REST API
- todo와 관련된 DB 스키마 및 모델링
기능구현
1. REST API
1 | // api/todos.ctrl.js |
2. SCHEMA & Modeling
1 | // models/todo.js |
About ICONLOOP
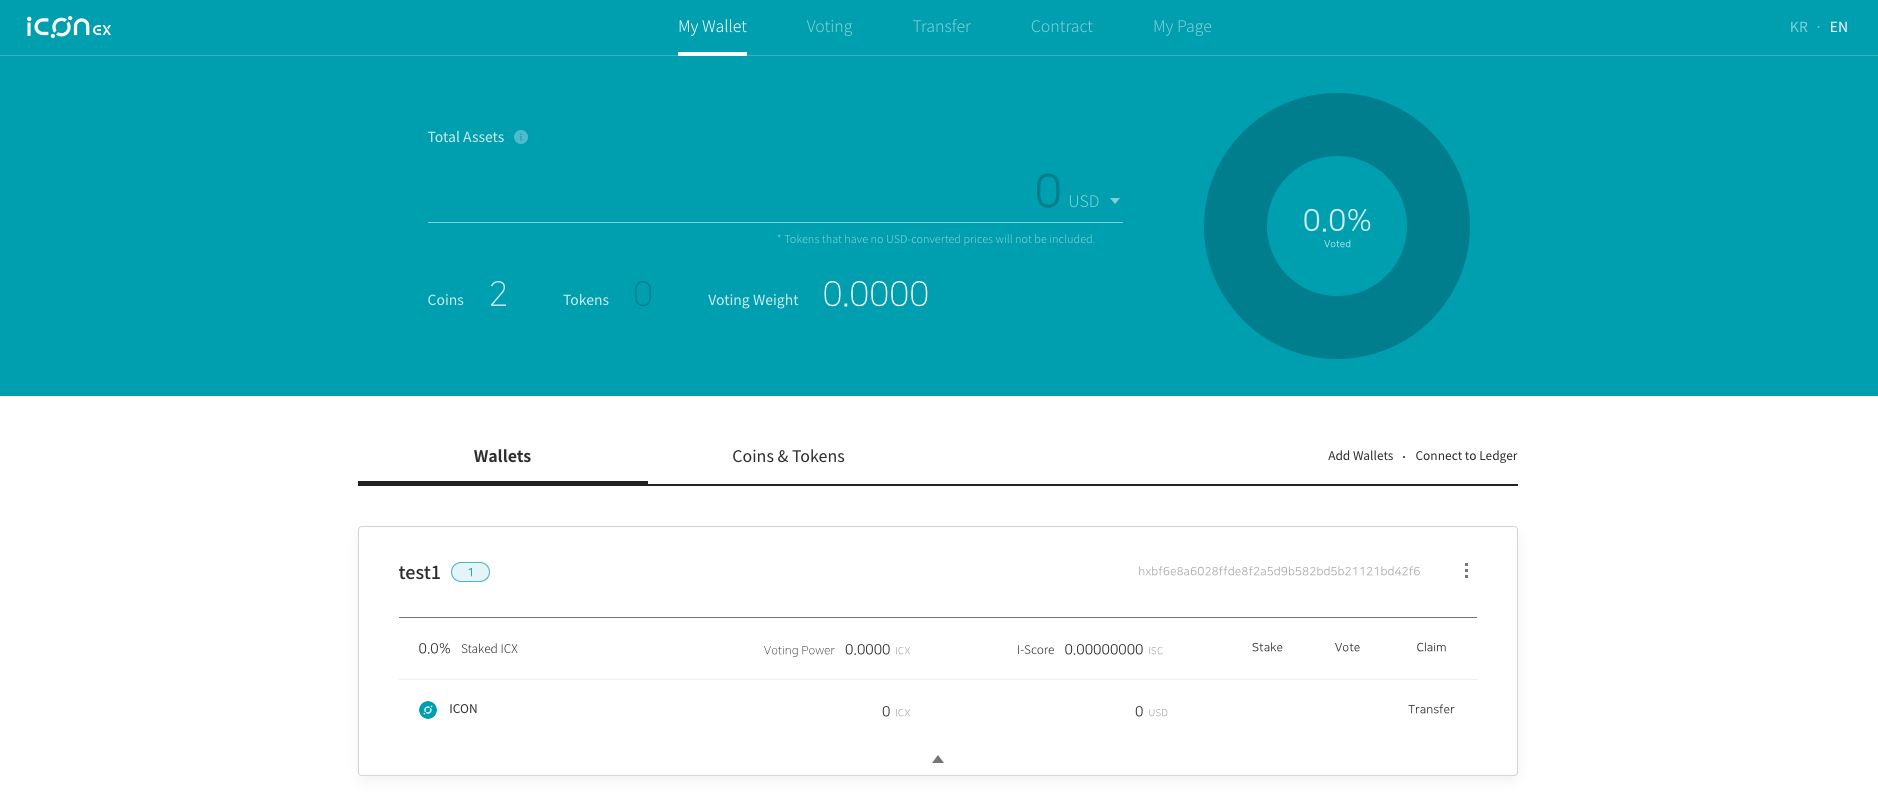
#3. ICONex: ICONLOOP의 암호화폐 지갑
- 용도: 암호화폐를 이체하고 소유할 수 있는 암호화폐 지갑
- 기술 스택: React, Javascript, HTML, CSS
- 협업 방식: 프론트엔드 개발자 2명, 백엔드 개발자 2명, 기획자 1명, 퍼블리셔 1명, 디자이너 1명
- 새로운 기획이 나오면 디자인을 하고 퍼블리싱을 한다.
- 프론트엔드는 개발자 2명이 새로운 기능 및 UI를 추가하거나 변경한다.
- 백엔드 개발자 2명이 서버와 API 담당한다.
기능구현
1. 각 지갑에 코인정보 추가하기
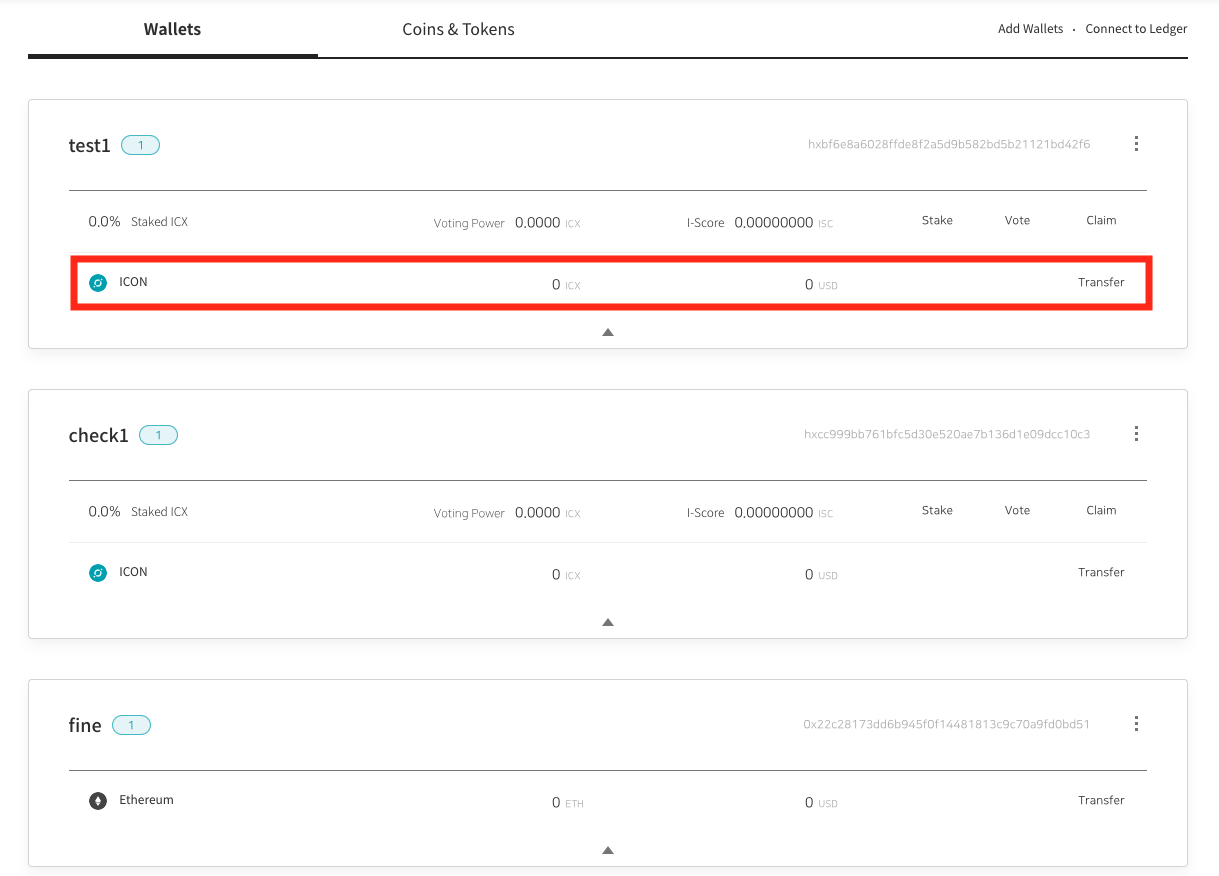
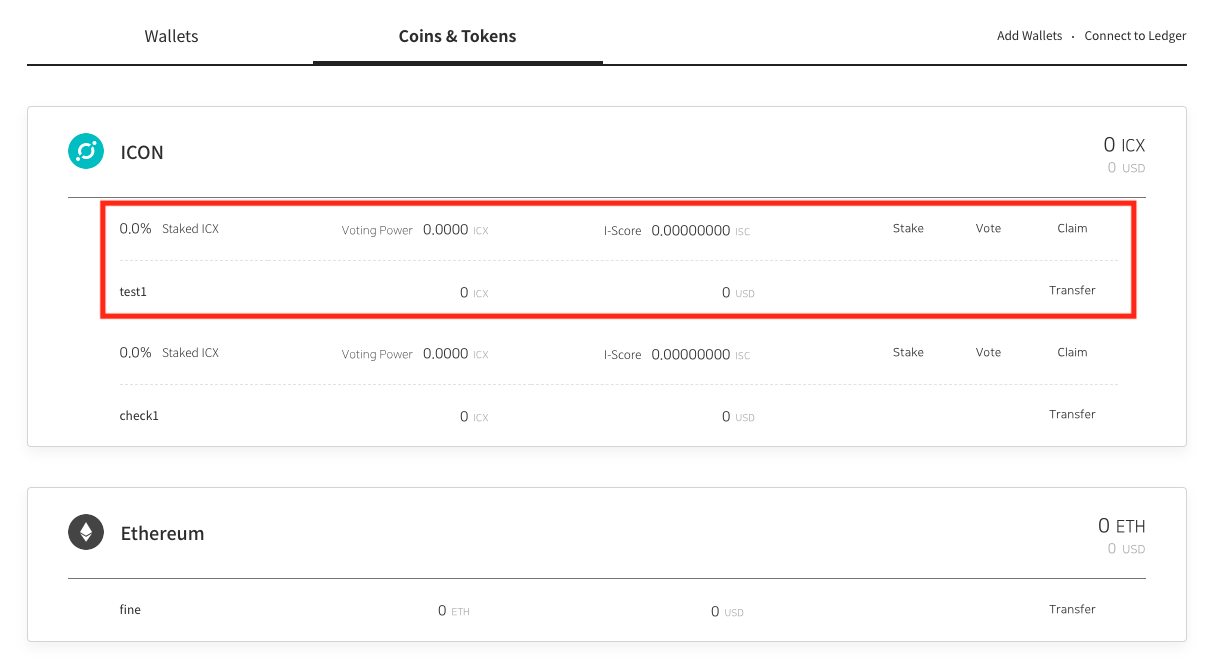
- 목표
- 각 지갑이 가지고 있는 코인에 대한 정보(WalletBar)를 보여주는 기능 구현
- 코인이 icx(ICON의 코인)일 경우, WalletBar 바로 위에 Staking 정보(Staking bar)가 같이 추가되는 기능 구현
접근법
- WalletBar에 대한 정보를 가지고 있는 배열을 각 지갑에서 mapping하여 보여주는 방식으로 코드 작성
- 이때, coinType이 ‘icx’일 경우에만 Staking bar(WalletStakingBar)를 같이 보여주는 방식으로 코드 작성
Code:
[WalletSection 컴포넌트]
1 | WalletSection.js |
2. token 아이콘 색상
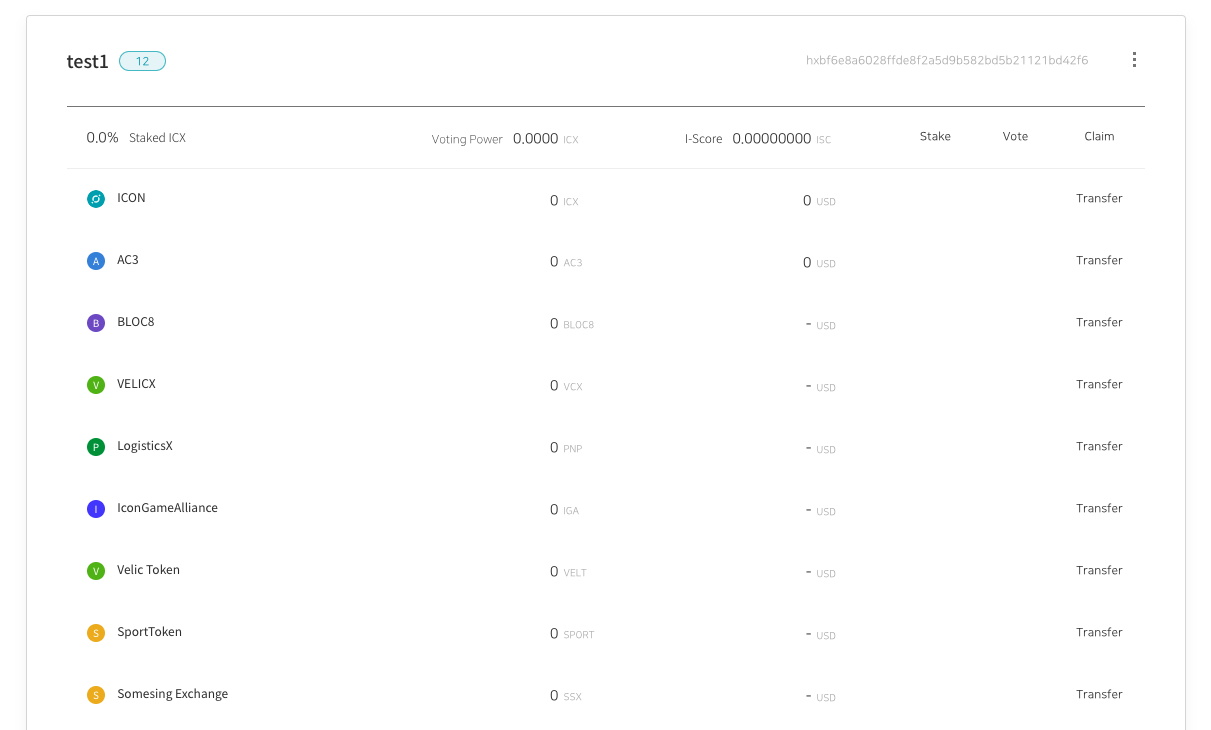
- 목표
- 아이콘 색상은 모두 12가지로, 알파벳 순서대로 색상을 순서대로 맞추고, 13번째 알파벳부터는 1번째 색상부터 다시 맞추는 방식으로 기능 구현
- token 이름의 첫번째 알파벳이 동일할 경우, 동일한 색상의 아이콘을 보여주는 기능 구현
접근법
- 각 토큰의 첫번째 알파벳의 unicode를 구하는 코드 작성
- unicode를 % 12로 계산하여 색상을 12가지내에서 찾는 방식으로 코드 작성
Code:
[WalletBar 컴포넌트]
1 | WalletBar.js |
[WalletSection 컴포넌트]
1 | WalletSection.js |
#2. 기부 캠페인 웹페이지
- 목표: 강원 산불 이재민을 위한 기부 캠페인 웹서비스 개발
- 기간: 2주
- 기술 스택: React, Javascript, HTML, CSS
- 협업 방식: 프론트엔드 개발자 2명, 백엔드 개발자 1명, 기획자 1명
- 기획을 바탕으로 프론트엔드 개발 시작
- 프론트엔드는 개발자 1명이 전반적인 구조와 퍼블리싱을 담당하고, 다른 1명은 UI 개발
- 백엔드 개발자 1명이 서버와 API 담당
- 나의 역할:
- 카카오톡 등 소셜로그인 기능 구현
- Input 이벤트와 dropdown 기능 구현
- 소셜 공유하기 기능 구현

기능구현
1. 카카오톡 로그인

- 목표
- 버튼 클릭시, 카카오톡으로 로그인 또는 로그아웃이 가능한 기능 구현
- 카카오톡 로그인을 통해 카카오톡 이메일을 화면에 보여주는 기능 구현
접근법
- 카카오톡 API를 활용해서 카카오톡 로그인/로그아웃 버튼 만듬
- 카카오톡 로그인 시 이메일을 Redux로 가져와 화면에 보여주는 방식으로 코드 작성
Code:
[KakaoLoginButton 컴포넌트]
1 | KakaoLoginButton.js |
[Donation 컴포넌트]
1 | Donation.js |
[Container 컴포넌트]
1 | Container.js |
2. Input 메세지
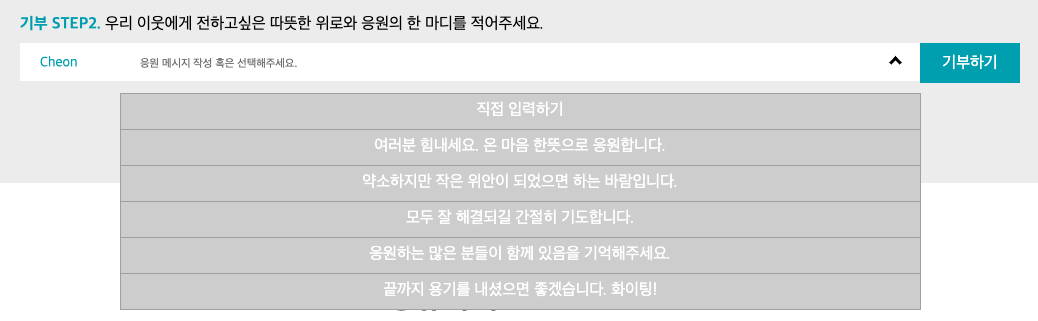
- 목표
- Input 클릭시, 메세지를 선택할 수 있는 dropdown 기능 구현
- 메세지를 선택하면, 해당 메세지가 Input의 값으로 보여주는 기능 구현
접근법
- Input에서 click 이벤트 발생시, 여러 메세지를 mapping하여 보여주는 방식으로 코드 작성
- 클릭한 메세지를 e.target.innerText로 잡아 Input의 message로 변경
Code:
[Donation 컴포넌트]
1 | Donation.js |
[Container 컴포넌트]
1 | Container.js |
#1. Token 투자 플랫폼
- 목표: 다양한 프로젝트에 Token으로 투자할 수 있는 웹서비스 개발
- 기간: 3주
- 기술 스택: React, Javascript, HTML, CSS
- 협업 방식: 프론트엔드 개발자 2명, 백엔드 개발자 2명, 기획자 1명, 퍼블리셔 1명
- 기획과 퍼블리싱된 코드로 프론트 개발 시작
- 프론트엔드는 개발자 1명이 전반적인 구조와 API를 담당하고, 다른 1명은 UI 개발
- 백엔드 개발자 2명이 서버와 API 담당
- 나의 역할:
- 투자하고 싶은 만큼의 token 금액을 입력하는 기능 구현
- 원하는 이미지를 크게 변경하여 볼 수 있는 기능 구현
- 투자하고자 하는 token 값을 변경시키는 Edit 버튼 기능 구현
기능구현
1. Input 값 변경

- 목표
- +, - 버튼을 만들어 Input 안에 값이 변할 수 있는 기능 구현
- Input 안에서 직접입력하여 원하는 값으로 바로 변경할 수 있는 기능 구현
접근법
- 입력한 값이 소수점 2자리까지만 올 수 있게 소수점(dot)의 index와 입력값의 크기를 비교하여 조건을 거는 코드 작성
- 입력한 값이 숫자와 “.” 1개만 포함되도록 “.”의 갯수로 조건절 사용
Code:
[InvestContainer 컴포넌트]
1 | InvestContainer.js |
[Project 컴포넌트]
1 | Project.js |
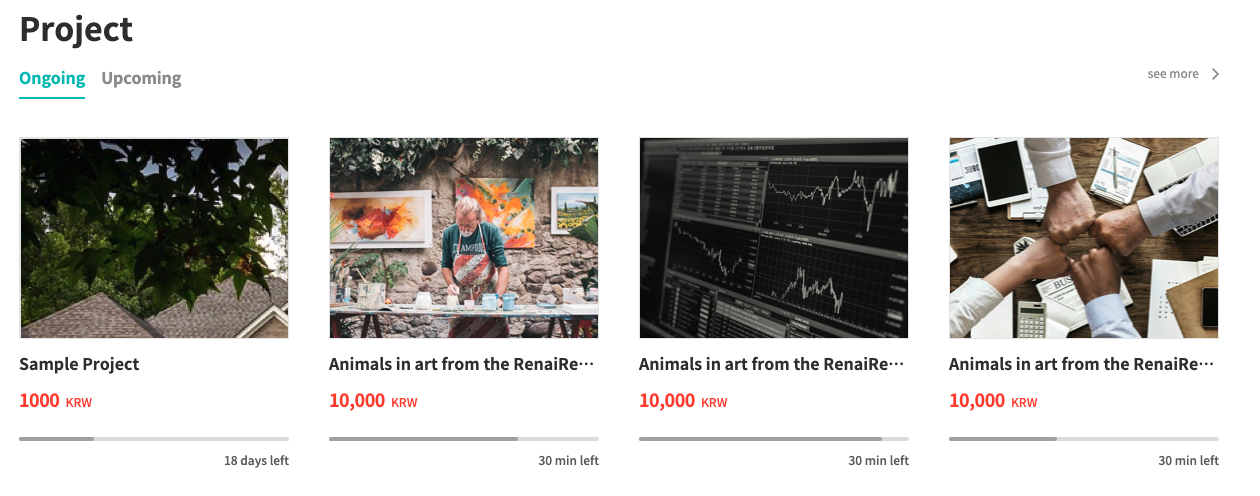
2. Image 크기 변경

- 목표
- 작은 이미지를 클릭하면, 클릭한 작은 이미지를 큰 이미지로 변경하는 기능 구현
접근법
- 클릭한 이미지의 id를 모든 이미지의 id와 비교후, 일치하는 id를 가진 이미지를 큰 이미지로 변경하는 방식으로 코드 작성
Code:
[InvestContainer 컴포넌트]
1 | InvestContainer.js |
[Project 컴포넌트]
1 | Project.js |
3. Edit 버튼

- 목표
- 클릭하면 값을 변경할 수 있는 버튼 기능 구현
접근법
- 현재 상태가 Editing인지 아닌지로 나누고, Editing일 경우 값을 변경할 수 있는 Input이 나오는 방식으로 코드를 작성
Code:
[InvestContainer 컴포넌트]
1 | InvestContainer.js |
[BuyingContract 컴포넌트]
1 | BuyingContract.js |
About Projects
#3. Banking System DApp 프로젝트
- 목표: Core 뱅킹 시스템 웹서비스 DApp 개발
- 기간: 2018.10.15 ~ 2018.10.19
- 기술 스택: Javascript, HTML, CSS, Web3.js, Meteor, Solidity
- 협업 방식: 프론트엔드 개발자 1명과 백엔드 개발자 3명
- 전반적인 기획 및 smart contract 기능은 공동으로 구현
- 프론트엔드는 1명이 웹서비스의 전반적인 UI 기능 구현
- 백엔드는 3명이 서버와 Geth로 트랜잭션 관리 및 구현
- 나의 역할:
- 입금 및 출금 기능을 smart contract로 구현
- 웹서비스의 전반적인 UI 기능 구현
- web3.js를 이용해 Ethereum 클라이언트와 연동 구현
- 동영상
- #1. Deposit & Withdrawal
- #2. Transfer
기능구현
1. Deposit(입금)
- 목표
- 로그인한 사용자의 계좌에 입력한 금액만큼의 토큰을 입금하는 기능 구현
- 접근법
- 클라이언트: Deposit form에서 입력한 값(계좌주소와 토큰값)과 사용자 id를 받아서 서버에 요청
- 서버: web3를 이용해서 배포한 컨트랙트 중 Deposit 함수를 호출하고 서버에 변경된 내용 저장
- Issues & Solutions
- #1: 클라이언트
- Issue: 입력한 값들을 변수로 선언하여, 서버에 요청해야하는데, Meteor에서 서버로 요청하는 방법을 모름
- Solution: Meteor에서 서버로 요청하는 방법에 대한 Document를 먼저 이해한 후, 적용하여 성공하면, alert를 띄우는 방식으로 코드를 작성
- #1: 클라이언트
1 | // deposit send button |
- #2: 서버
- Issue: 컨트랙트에서 정의한 Deposit 함수를 호출하는 방법을 모름.
- Solution: web3 Docs와 구글링을 통해 배포한 컨트랙트를 호출하는 방법을 찾아 코드를 작성
- Code:
1 | Meteor.methods({ |
2. Modal UI
- 목표
- 입금 및 출금 기능이 작동할 때, Modal을 띄워 진행하는 기능 구현
- 접근법
- Bootstrap Modal 코드를 사용하여 Deposit 버튼 클릭시, Modal을 띄우기
- Issues & Solutions
- Issue: Modal은 띄웠으나, Deposit 기능이 모두 수행된 후에도, 여전히 focus가 Modal에 가 있어서, 다른 화면의 기능들을 사용할 수가 없게됨.
- Solution: modal의 ‘hide’ 기능을 하는 코드를 추가하여, modal을 숨기게 하여, 이동된 화면에 focus가 가게함.
- Code:
1 | // hide modal |
3. Smart Contract for Deposit & Withdrawal
- 목표
- 스마트 컨트랙트의 기능 중 입금 및 출금에 대한 컨트랙트 함수 기능 구현
- 접근법
- 입금 또는 출금되는 토큰의 값이 현재 가지고 있는 토큰의 양보다 적을 경우에만 적용되는 코드를 작성
- 만약 위 내용이 true이면, 입금 또는 출금되는 계좌의 토큰에서 +-를 하고, 전체 계좌(운영자 계좌)에서 토큰의 양이 +-되는 방식으로 코드를 작성
- Issues & Solutions
- Issue: payable의 사용여부에 대해 불확실함
- Solution: 돈을 받거나 보내는 함수를 작성할 때는 항상 payable가 필요함.
- Code:
1 | // deposit |
#2. CryptoCurrency History Chart 프로젝트
- 목표: Top 100개의 암호화폐의 가격을 쉽게 볼 수 있는 차트 페이지 개발(개인 프로젝트)
- 기간: 2018.09.24 ~ 2018.09.28
- 기술 스택: Angular, Typescript, Javascript, CSS, HTML
- 핵심 기능:
- 암호화폐 시가총액 및 가격 랭킹 테이블
- 암호화폐의 가격 차트
- 각 암호화폐의 기간별 가격 차트
- 활용한 라이브러리 및 API: coincap.io, chart.js
- 동영상
기능구현
1. 암호화폐 랭킹 테이블
- 목표
- Top 100개의 암호화폐 시가총액 및 가격을 랭킹별로 보여주는 테이블 기능 구현
- 각 암호화폐를 클릭하면, 클릭한 암호화폐의 가격 차트를 보여주는 기능 구현
- 접근법
- coincap.io API에서 모든 암호화폐에 대한 시가총액 및 가격을 가져옴.
- 암호화폐 랭킹 테이블에서 어떤 암호화폐를 클릭시, 클릭한 암호화폐에 대한 가격 차트를 보여주기 위해, coincap.io에서 각 암호화폐에 맞는 API를 가져와 사용
- Issues & Solutions
- #1
- Issue: 암호화페 랭킹 테이블에서 어떤 암호화폐를 처음 클릭시, 처음에는 차트가 표시가 안된다.
- Solution: 원인은 httpclient로 서버에 요청을 보낼 때, 비동기이기 때문에 다른 코드가 먼저 실행된다. 그래서 서버에서 데이터를 받기 전에 차트가 표현되는 함수가 호출되어, 날짜(this.dates)가 undefined로 나타나게 되었기 때문에, 차트가 만들어지지 않게 되었다. 이를 해결하기 위해, httpclient에 subscribe안에서, 함수를 바로 호출하여 dates, prices 등을 가져왔고, 그럼으로써 dates가 만들어져 차트가 나타나게 구현되었다.
- Code:
- #1
1 | // get a chart from api of coin clicked |
- #2
- Issue: 시가총액 및 가격에 대한 날짜 데이터를 가져왔지만, 날짜 형태가 아닌 숫자로 나와 있었음.
- Solution: 사람이 알아볼 수 있는 날짜 형태로 전환하기 위해, new Date()를 생성하고, Date 함수의 메소드를 이용해서 숫자를 날짜 형태로 전환함.
- Code:
1 | convertDates(data: any) { |
2. 암호화폐 가격 차트
- 목표
- 암호화폐별, 그리고 각 암호화폐의 history를 보여줄 수 있는 기간별 기능 구현
- 접근법
- chart.js 라이브러리를 활용하여 기간에 따른 가격을 보여주는 차트 기능 구현
- Issues & Solutions
- #1
- Issue: 차트 라이브러리는 처음 사용해봐서 어떻게 사용해야 하는지 잘 몰랐음.
- Solution: chart.js docs를 보면서 최대한 간단한 차트 예제를 활용하여 적용함.
- Code:
- #1
1 | coinChart(crytoName: string) { |
#1. 야놀자 펜션 클론 프로젝트
- 목표: 야놀자 펜션 웹사이트의 핵심 기능 위주로 MVP 개발
- 기간: 2018.07.30 ~ 2018.08.23
- 기술 스택: Angular, Typescript, Javascript, CSS, HTML
- 협업 방식: 프론트엔드 개발자 3명과 백엔드 개발자 3명
- 프론트엔드 개발자끼리는 핵심 기능을 역할분담하여 정해진 각 기간에 따라 각자 구현하고 코드를 Git으로 합치면서 진행
- 백엔드 개발자와는 데이터를 서버와 잘 주고 받기 위해 협업하면서 진행
- 나의 역할: 야놀자 펜션의 펜션 룸을 예약하는 예약페이지 및 결제 방식에 따라 결제하는 결제페이지 구현
- 동영상
기능구현(예약페이지 & 결제페이지)
1. Calendar
- 목표
- 오늘 날짜를 기준으로 이미 지난 날짜들은 Calendar에서 선택을 못하게 하는 기능 구현
- 선택한 날짜에 따라 그 날짜에 해당하는 펜션 룸 Table 정보를 보여줌으로써, 각 날짜의 각 펜션 룸들의 예약상태가 ‘예약가능’인지 ‘예약완료’인지 알 수 있게 하는 기능 구현
- 접근법
- Angular Bootstrap에서 Datepicker API를 가져와 사용
- Datepicker API “markDisabled” 문법에 따라, Calendar에 있는 모든 날짜와 오늘 날짜를 비교해서 오늘 보다 이전 날짜들에 대해 Calendar에서 선택을 못하게 하는 코드 작성
- Calendar에서 날짜를 선택할 때마다, 함수를 호출하여 함수안에 매개변수를 선택한 날짜로 줘서, 그 선택한 날짜를 url로 서버에 요청하여 펜션 룸 Table에 펜션의 룸들의 예약상태를 그 선택한 날짜에 맞게 예약페이지에 보여주는 코드 작성
- Issues & Solutions
- #1
- Issue: Datepicker API를 어떤식으로 가져와서 사용해야 할지 감이 안잡힘
- Solution: Datepicker API 사이트의 어떤 1개의 Example Calendar를 그대로 가져와 그 Example에서 사용된 코드를 Datepicker API 문법을 보면서 전반적으로 이해하려고 노력하면서 감을 잡음
- #2
- Issue: Calendar에 있는 모든 날짜와 오늘 날짜를 비교하기 위해 Date 함수를 가지고 어떻게 날짜를 비교해야하는지 판단이 어려움
- Solution: 처음에는 날짜의 year/month/day를 하나씩 비교해가면서 작성했으나 코드의 양이 너무 많아짐. 그래서 좀 더 간단히 비교할 수 있는 방법을 찾기 위해 Date 함수의 메소드를 찾다가 getTime() 메소드를 알게됨. 즉, 날짜를 비교할 때, milliseconds의 총합으로 비교하면 간단히 날짜를 비교할 수 있다는 것을 알게되어 이 메소드를 코드에 적용해서 해결함.
- Code:
- #1
1 | // HTML |
- #3
- Issue: 선택한 날짜를 가지고 어떻게 url을 만들어서 서버와 통신할지에 대한 고민
- Solution: 선택한 날짜의 year/month/day로 문자열을 만들어서 http client를 사용해 url로 코드를 작성
- Code:
1 | // HTML |
- 배운점
- 개발할 때, 밑바닥부터 모든 것을 코딩하는 것이 아닌 필요한 기능들에 대한 API를 찾아보고, 실제로 어떻게 적용하는 것인지를 경험함.
- Date 함수를 이용해 날짜를 비교하는 방법을 알게됨.
- 서버와 어떻게 통신하여 데이터를 화면에 보여주는 방법을 알게됨.
2. 펜션 룸 Table
- 목표
- 선택한 펜션 룸에서 선택한 기간에 맞춰 전체 가격이 변경되는 기능 구현
- 성인, 아동, 유아의 총 인원수가 선택한 방의 최대 인원수보다 많을 경우 경고창을 보내는 기능 구현
- 추가되는 성인, 아동, 유아의 인원수마다 전체 가격이 추가되는 기능 구현
- 접근법
- 기간을 선택할 수 있는 select 박스에 선택한 기간을 값으로 하는 매개변수로 하는 함수를 호출하여 전체 가격을 계산하는 코드 작성
- 성인, 아동, 유아의 인원수를 선택할 수 있는 select 박스에 선택한 인원수를 값으로 하는 매개변수로 하는 함수를 호출한 후, 성인, 아동, 유아의 인원수의 총합과 선택한 방의 최대 인원수와 비교하는 코드를 작성
- 성인, 아동, 유아의 인원수를 선택할 수 있는 select 박스에서 선택한 인원수와 각 성인, 아동, 유아 추가 금액(extra charge)을 계산하여 전체 가격에 더해서 총 가격을 보여주는 코드 작성
- Issues & Solutions
- #1
- Issue: 선택한 기간의 값은 함수의 매개변수로 전달받았으나, 모든 룸이 아닌 사용자가 선택한 펜션 룸만의 기본 가격을 어떻게 가져와야 하는지 고민
- Solution: 모든 펜션 룸의 pk 중에서 선택한 룸의 pk와 같은 룸만을 filter하여 그 룸의 가격을 찾게 하도록 코드를 작성
- Code:
- #1
1 | // HTML |
- 배운점
- select 박스 등의 HTML에서 이벤트 바인딩을 통해 값을 전달하여 변경된 값을 화면에 보여주는 코드를 작성하는 방법을 배움.
3. 결제 Form
- 목표
- 예약자 정보 및 선택한 결제 방식(신용카드/무통장)에 맞는 결제 정보를 입력하는 폼 기능 구현
- 예약자 정보 및 각 결제 정보에 대한 유효성 검증을 하여, 맞지 않게 입력되면, 경고를 주는 폼 에러처리 기능 구현
- 접근법
- Angular에서 제공하는 폼을 이용해서 폼 및 폼 에러처리 기능 코드 작성
- Issues & Solutions
- #1
- Issue: Angular에서 제공하는 폼에 대한 이해 및 사용법을 숙지하는데 시간이 걸림
- Solution: 한번에 모든 결제 정보의 에러처리 기능을 테스트하기 보다, 하나씩 결제 정보의 에러 기능을 테스트하며 구현함.
- Code:
- #1
1 | // HTML |
- 배운점
- 처음 사용해 보는 기능을 코드에 잘 적용하기 위해서는 사용하려는 기능에 대해 충분히 이해를 하고 하나씩 작은 단위로 테스트 해보면서 하는 것이 결국, 더 정확하게 빠르게 코딩을 할 수 있다는 것을 배움.