Redux란 무엇인가?
Redux란, 상태관리에 대한 라이브러리로써, 애플리케이션의 모든 컴포넌트에 대한 중앙집중식 저장소 역할을 하며, 단순히 하나의 컴포넌트가 아닌 여러 개의 컴포넌트에 적용하는 상태들을 관리하는 곳이다.
Redux를 왜 사용하는가?
리액트에서 기본적으로 부모 컴포넌트에서 상태를 관리하고, 자식으로 상태를 전달한다. 그러나, 앱 규모가 커지면, 데이터가 많고, 유지보수가 힘들다. Redux를 사용하면, 상태값을 컴포넌트에 종속시키지 않고, 상태 관리를 컴포넌트 바깥에서 관리가 가능하다.
Redux 필수 개념
Action
- Action이란, 상태에 변화를 일으킬 때 참조할 수 있는 객체이다.
- Action 객체는 필수적으로 type 이라는 값을 가지고 있어야 한다.
- 예로, { type: ‘INCREMENT’ } 라는 객체를 전달 받으면, Redux Store는 ‘상태에 값을 더해줘야 하구나’라고 생각하고 Action을 참조하게 된다.
- type은 필수이고, 그 다음 값(예로 diff 등)은 option이다.
Reducer
- Reducer란, 액션 객체를 받으면 액션의 타입에 따라 어떻게 상태를 업데이트 하는지, 업데이트 로직을 정의하는 함수이다.
- Redux Store에는 Reducer가 있다.
- Reducer에는 2개의 parameter가 존재한다.
- State: 현재 상태
- Action: 액션 객체
- 상태가 변하면, 구독하고 있던 컴포넌트에게 알려서, 새로운 상태로 리렌더링함.
Redux 3가지 규칙
각 애플리케이션에서는 단 1개의 Store를 사용한다.
상태는 읽기전용이다.
- 기존의 상태는 건들이지 않고, 새로운 상태를 생성하여 업데이트 해주는 방식으로 하면, 나중에 개발자 도구를 통해서 뒤로 돌릴 수도 있고, 다시 앞으로 돌릴 수도 있다.
- immutable.js를 사용하여 불변성을 유지하며 상태를 관리한다.
변화를 일으키는 함수, 즉, Reducer는 순수한 함수이다.
- 순수한 함수란, 동일한 인풋이라면 언제나 동일한 아웃풋이 나오는 함수이다. 즉, 똑같은 파라미터로 호출된 리듀서 함수는 언제나 똑같은 결과값을 반환해야 한다.
- 이전 상태는 안 건들이고, 변화를 일으킨 새로운 상태 객체를 만들어서 반환한다.
- 순수 하지 않은 것, 즉 실행 할 때마다 다른 결과값이 나오는 것들은 Reducer 함수가 아닌 바깥에서 처리해야 한다.
- 실행할 때마다 다른 결과값이 나오는 것들
- New Date()
- 랜덤 숫자 생성
- 네트워크에 요청
- 실행할 때마다 다른 결과값이 나오는 것들
Redux 파일 구조
- Root.js - React 앱에 Redux 적용(최상위 컴포넌트)
- 컨테이너 컴포넌트(Store)
- CounterContainer.js - Redux와 연동하는 컴포넌트
- 프레젠테이셔널 컴포넌트(View)
- Counter.js - Counter 기능을 보여주는 View
- Store
- modules - 기능별로 액션 및 리듀서를 각 1개 파일에 작성(하나의 파일에 모두 작성하는 것을 Ducks 구조라고 한다.)
- counter.js - counter 기능과 관련된 액션 및 리듀서
- index.js - 리듀서 합치는 파일
- configure.js - Redux 스토어를 생성하는 함수를 모듈화하여 내보내는 파일
- index.js - store를 생성하여 모듈화하여 내보내는 파일
- 이렇게 모듈화된 스토어는 브라우저 에서만 사용되는 스토어
- 서버사이드 렌더링을 하면, configure를 통하여 그때그때 만든다.
- 이렇게 모듈화된 스토어는 리액트 app을 초기설정할 때 사용
- actionCreators.js
- 스토어를 불러오고, 각 모듈들에서 선언했던 액션 생성함수들을 불러와서 스토어의 dispatch와 미리 바인딩 작업을 한다.
- modules - 기능별로 액션 및 리듀서를 각 1개 파일에 작성(하나의 파일에 모두 작성하는 것을 Ducks 구조라고 한다.)
Redux Flow

출처: Redux Flow
Redux 사용법
- Redux install: npm install redux react-redux
- 리액트 앱에 Redux 적용하기(Root.js)
- 리액트 앱에 Redux를 적용할 때는, react-redux에 있는 Provider를 사용
- 기능을 보여줄 화면 구성(Counter.js)
- Counter 숫자화면
- 증가/감소 버튼
- Counter 숫자화면
- 기능과 관련된 action과 reducer 작성(modules/counter.js)
- 액션 타입 정의
- 액션 생성 함수(ActionCreator) -> createAction 사용
- 모듈의 초기 상태 정의
- Reducer 정의: switch문 -> handleActions 사용
- 여러 reducer가 있을 경우, 하나로 합치기(modules/index.js)
- store를 만드는 함수 configure 만들어서 내보내기(store/configure.js)
- Const store = createStore(modules)
- 위에서 만든 configure 함수를 사용하여 스토어를 만들고 내보내기(store/index.js)
- Redux와 연동할 컨테이너 컴포넌트 만들고, 그 안에 프레젠테이셔널 컴포넌트인 counter.js를 리턴해서 화면에 보여주기(containers/CounterContainer.js)
- 이 컴포넌트를 App에 불러와 화면에 보여주기(components/App.js)
- 컨테이너 컴포넌트를 Redux에 연결하기(containers/CounterContainer.js)
- mapStateToProps: props 값으로 넣어 줄 상태를 정의
- 컴포넌트에 state로 넣어줄 props를 반환
- 컴포넌트에 넣어줄 액션 함수들을 반환
- mapDispatchToProps: props 값으로 넣어 줄 액션 함수들을 정의
- Connect(): 컴포넌트를 Redux와 연동 할 때 사용
- mapStateToProps: props 값으로 넣어 줄 상태를 정의
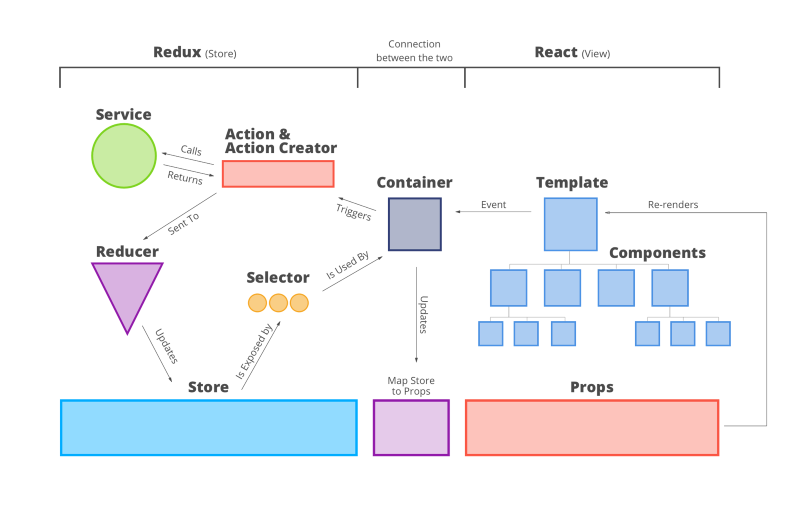
Redux Architecture
실제 코드를 작성할 때, 위 그림을 연상하면서 코드를 짜면 좀 더 쉬울 것이다.
Redux 코드 예제
[1] npm으로 redux를 설치한다.
1 | npm install redux react-redux |
[2] 리액트 앱에 Redux를 적용한다.
이때, react-redux에 있는 Provider를 사용한다.1
2
3
4
5
6
7
8
9
10
11
12
13
14
15index.js
import React from 'react';
import ReactDOM from 'react-dom';
import { store } from 'redux/store/store';
import { Provider } from 'react-redux';
import App from 'app/App.js';
ReactDOM.render(
<Provider store={store}>
<App />
</Provider>
, document.getElementById('root'));
//registerServiceWorker();
[3] 보여줄 화면 UI를 만든다.
“KR” 또는 “EN”을 클릭하면, 각 언어에 맞게 화면이 바뀌는 화면 컴포넌트다.1
2
3
4
5
6
7
8
9
10
11
12
13
14
15
16
17
18
19
20
21
22
23
24
25
26
27
28
29
30
31
32
33
34
35
36
37
38
39
40
41
42
43
44
45
46
47
48
49Header.js
import React, { Component } from 'react';
import {
routeConstants as ROUTE
} from 'constants/index.js';
import { Link, withRouter } from 'react-router-dom';
import withLanguageProps from 'HOC/withLanguageProps';
import { isEmpty } from 'utils';
const INIT_STATE = {
showInfo: false,
toggleLanguageList: false
}
@withRouter
@withLanguageProps
class Header extends Component {
constructor(props) {
super(props);
this.state = INIT_STATE;
}
render() {
const { setLanguage, language, location, I18n } = this.props;
return (
<div className="header-wrap" onClick={this.onHeaderClick}>
<div className="wrap-holder">
{showHeaderItem && (
<Link to={ROUTE['home']}><p className="logo"><span className="_img"></span></p></Link>
)}
// "KR" & "EN" 클릭 View
<div className="language-holder">
<span onClick={() => setLanguage('kr')} className={language === 'kr' ? 'on' : ''}>KR</span>
<span className="dot">·</span>
<span onClick={() => setLanguage('en')} className={language === 'en' ? 'on' : ''}>EN</span>
</div>
</div>
</div>
);
}
}
export default Header;
[4] 액션타입과 액션생성자 함수를 만든다.
액션타입은 다음과 같다.1
2
3
4
5
6
7
8
9
10actionTypes.js
const actionTypes = {
// globalActions
setLanguage: 'SET_LANGUAGE',
}
export default actionTypes;
액션생성자 함수는 다음과 같다.1
2
3
4
5
6
7
8import actionTypes from 'redux/actionTypes/actionTypes';
export function setLanguage(lan) {
return {
type: actionTypes.setLanguage,
payload: lan
};
}
[5] Reducer 함수를 만든다.
1 | globalReducer.js |
[6] store를 만드는 함수를 만들고, 내보낸다.
1 | store.js |
[7] rootReducer를 만든다.
rootReducer는 모든 Reducer들을 한번에 모아놓은 파일이다.
1 | import { combineReducers } from 'redux'; |
[8] store.js에서 store 생성후, index.js의 Provider에 제공한다.
1 | index.js |
[9] Container 컴포넌트를 Redux와 연결한다.
1 | HeaderContainer.js |
